
How to play PokeSurvivor: your first 10 minutes
This is our practical answer to how to play PokeSurvivor, written for your first run. In short: you steer, your partner Pokémon attacks on its own, and every level-up asks you to pick 1 of 3 cards. This PokeSurvivor guide skips the encyclopedia and focuses on what to do, minute by minute.
Before your first run: the quiz and your starter

Your first run opens with an 8-question personality quiz in the style of Mystery Dungeon. It assigns a partner from 29 starters: the starters of all 9 generations plus Psyduck and Slowpoke. You can turn the result down and pick another. Don't overthink it. Every starter opens with one of six moves, and all six evolve. For our full comparison, read our best starter pick; for rankings, see the PokeSurvivor tier list.
If you are new to the genre, the short version of how to play PokeSurvivor is that positioning is your only direct input, so everything else on this page is about making your partner's attacks land while you stay safe.
One PokeSurvivor beginner tip from us: if you just want an easy first run, Water Gun starters are forgiving. The official move data calls it a piercing shot that is "Reliable at any range", and its cooldown (community observation: 0.44 s) is the fastest of the six starting moves.
Controls on PC and touch screens
You only move. Your partner attacks automatically. The PokeSurvivor controls below are from the official guide, and there are only three actions to learn.
| Action | PC | Phone / tablet |
|---|---|---|
| Move | WASD or ↑←↓→ | Drag a finger anywhere; the joystick appears where you touch (a fixed joystick is optional) |
| Switch active move | 1–4, Q/E, or click the move icon | Tap a move |
| Pause | Esc | Top-right button |
| Screen | Browser (no orientation rule stated) | Landscape only |
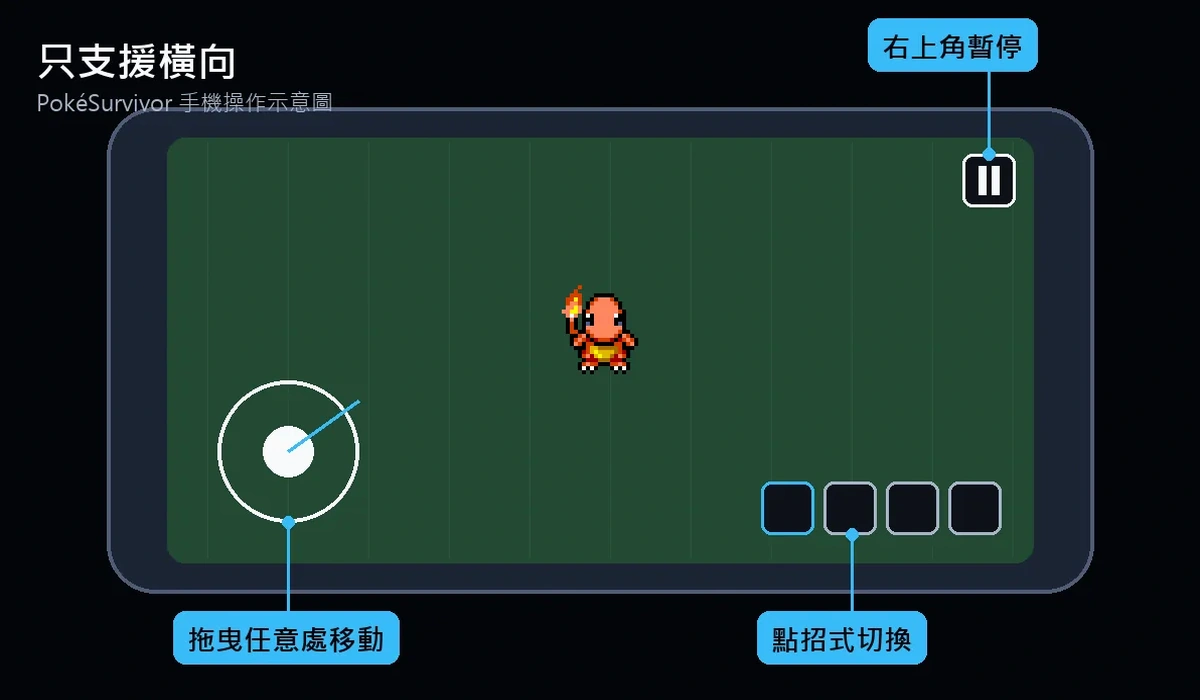
On a phone, turn the device to landscape before you start. The joystick appears wherever your thumb lands, so you never need to look for it; if you prefer a stick that stays put, the fixed joystick added on 2026-10-14 is optional. Chinese-speaking players can find the same basics in our 中文攻略 (Traditional Chinese guide).
The level-up loop: 1 of 3 cards
Defeated enemies drop experience orbs. They stay put until you come within your pickup (Magnet) radius, then fly to you. Each level-up shows 3 cards, and you take one: a new move, an upgrade to a move you own, or a stat boost. A reroll option exists if nothing fits. Learning how to play PokeSurvivor well is mostly learning which card to take.
The 4 slots and "only the active move fires"
You can hold up to 4 moves, but only the active one fires. That is the key difference from other survivors-likes, where every weapon fires at once. A second move is a tool you switch to (a wide melee arc for crowds, a homing shot for spread-out enemies), not extra damage. Legendary bonds from rifts later let two moves fire at once from one slot.
Our card advice (fan opinion)
The following card values are from player testing and community observation; the official guide has not published them:
- Early: upgrade your starting move first. In our runs a focused move beats four weak ones, because only one fires.
- Second move: take one that covers a different pattern than your starter, so switching actually changes something.
- Stats: Power (+10% damage, community observation) and Reflexes (−8% cooldown, community observation) help any build. Magnet (+30% pickup radius, community observation) makes early levels come faster. Vigor (+20 max HP, community observation) or Armor (+6% damage reduction, capped at 70%, community observation) when bosses start hitting hard.
- Sitrus Berry heals 45% (community observation) at once. We only take it when we are actually low.
Move evolution: level 5 plus the right card
Evolutions are the part of how to play PokeSurvivor that new players miss most often. Moves level up to 5. According to the official moves page, once a move is at max level and you have also taken its required upgrade card in that run, a golden evolution card appears. Take it. These are the evolutions of the six starter moves:
| Starting move | Evolves into | Required card |
|---|---|---|
| Ember | Fire Blast | Power |
| Water Gun | Scald | Power |
| Bubble | Surf | Sprint |
| Vine Whip | Power Whip | Power |
| Razor Leaf | Leaf Storm | Reflexes |
| Confusion | Psyshock | Reflexes |
So in practice: pick the needed stat card at least once early, then push your starting move to level 5. The game has 64 total moves, of which 59 evolve (player counts from testing); the official page lists the rest.
The four personality enemies
Part of learning how to play PokeSurvivor is knowing which enemy to shoot first. Since the 2026-10-08 update, some enemies "heal, shield, summon or explode". The official tip is to kill healers and shielders first. Here is how we handle each one.
- Healer (Chansey, Blissey, Audino, Clefairy and others): heals nearby allies by 15% every 3.5 s. Switch to a single-target or homing move and focus it.
- Shielder (Shuckle, Bronzong, Mr. Mime, Bastiodon and others): puts a 35% HP shield on 6 allies. Kill it before chewing through the pack.
- Summoner (Nidoqueen, Vespiquen, Golbat, Gyarados and others): calls 2 of its pack. Kill it early, or the screen fills up.
- Kamikaze (Voltorb, Electrode, Koffing, Geodude and others): walks up and explodes after a 1 s warning. Keep moving and step away when it flashes.
Telegraphed ground markers
Some enemies attack with beams, zones, fans or jumps. Filling circles and lines on the ground are incoming attacks, so step out of them before they finish filling. Bosses use the same warnings.
Coins and the gacha system
Coins are the permanent currency you earn from runs. According to the official guide, you collect coins automatically during play and from mission rewards. The main uses are unlocking new starter Pokémon (29 total across all generations) and drawing from the gacha system for passive abilities and cosmetics.
How the gacha works
The gacha unlocks after your first successful run reaches a certain milestone (the exact timing varies by patch). You use gacha tickets—earned from boss drops, daily missions, or purchased with coins—to draw passive abilities that apply to all future runs. Common draws include stat bonuses (+5% damage, +10 max HP) and quality-of-life perks like wider pickup radius or faster cooldown recovery. Rare draws grant stronger passives such as starting with an extra move slot or bonus XP gain. The gacha follows a pity system: after a set number of draws without a rare result, your next pull is guaranteed to be higher rarity. Check the official news page for current gacha rates and featured passives.
Missions and daily tasks
Missions appear in the main menu and reward coins, tickets, or unlock progress. Daily tasks refresh each day and typically ask you to complete a run with a specific starter, reach a certain minute mark, or defeat a legendary. Weekly missions offer larger rewards for longer challenges like clearing 10 rifts or winning with all Water-type starters. Completing missions is the fastest way to build your coin stockpile for gacha pulls and new starters.
Bosses, held items and weather
Bosses every 3 minutes
A big part of how to play PokeSurvivor well is respecting the 3-minute clock. The first boss arrives at minute 3, then more at minutes 6, 9, 12 and 15. They are strong non-legendary Pokémon with 4 telegraphed attacks, and they enrage at half HP. Each can drop a ×10 gacha ticket (the official guide says "sometimes"; in the current code it is one boss in three). Our advice: keep circling, and save your best damage card picks for just before the 3-minute mark. Legendaries are a separate fight: they wait inside rifts, and our legendary rifts guide explains the 18 arenas and the bonds you win.
Held items: one at a time
Held items are simpler than they look. You can hold only one item, and it lasts the whole run. Items come from chests and boss drops, per the official item list. For a first run we like Leftovers (1.5% HP/s) or Focus Sash (survive at 1 HP every 60 s). Choice Band gives +40% damage but locks your move, which clashes with switching, so we skip it until you know your build.
Weather
From minute 2 there is a chance of weather each minute, lasting about a minute. Rain boosts Water and weakens Fire; harsh sun does the reverse. Sandstorm and snow chip at Pokémon that aren't the favoured types, and snow also slows them. Fog boosts Ghost, Fairy and Psychic. A Fire starter in rain is weaker for that minute, so play safer.
Type effectiveness and Arceus event
Type matchups work as in the main series: Water beats Fire, Fire beats Grass, Grass beats Water, and so on. The game shows a small damage-number colour change when you land a super-effective hit. For a full chart, the official guide links to a type chart or you can reference any Pokémon type matchup table. Knowing your starter's weaknesses helps when weather shifts or when facing type-disadvantaged bosses.
At the 30-minute mark, Arceus may appear as a special challenge boss. According to the official news, defeating Arceus grants a unique cosmetic reward or a high-tier gacha ticket. This event is rare and demands a fully evolved moveset, multiple defensive stat picks, and a held item. Only attempt it if you have reached minute 30 with comfortable HP and at least two level-5 moves.
Fan plan: your first 10 minutes
- 1
0:00–1:00: Learn the movement
Take upgrades for your starting move and one Magnet if offered.
- 2
1:15 onward: Rifts can open
Early ones are the safest to try while your HP is full; skip one if your move is still weak, because losing a rift sends you back with 30% HP. Our rifts guide covers when to go in.
- 3
2:00: Weather may begin
Note whether it helps or hurts your type.
- 4
2:00–3:00: Prepare the evolution
Make sure you have taken your evolution's required card once. Add a second move with a different pattern.
- 5
3:00: First boss
Watch the ground markers, keep moving, and switch to your strongest single-target move.
- 6
3:00–6:00: Evolve your starting move
Push your starting move to level 5 and grab the golden evolution card. Kill healers and shielders first.
- 7
6:00: Second boss
Equip whatever held item you have found; one at a time.
- 8
6:00–9:00: Add defence
Mix in Vigor or Armor. Bring a second move toward level 5.
- 9
9:00–10:00: Third boss
Third boss at minute 9. Reaching it on your first run means the basics have clicked.
Follow that plan and you know how to play PokeSurvivor well enough to reach the fourth boss at minute 12. After those ten minutes, the next questions are usually about which partner to grind for and which moves to prioritise. Our partner tier list ranks them, and our guide to the best early Pokémon explains the easiest first choice.
Beginner questions
Why does only one of my moves attack?
Only the active move fires. Switch with 1–4 or Q/E on PC, or tap the move on touch.
When does a move evolve?
At level 5, once you have also taken the required card in that run. Then a golden card appears.
Where can I check exact numbers for moves and items?
Use the official pages: the moves page for evolution requirements, the item list for held-item effects, and the official guide for the rest. This page covers the order to learn them in, not every value.
Can I play with friends?
Yes, up to four players online. See our co-op guide for rooms, shared XP and revives.
What mistake do new players make most often?
In our experience, picking four new moves early. Because only one fires, upgrading your main move pays off sooner.